
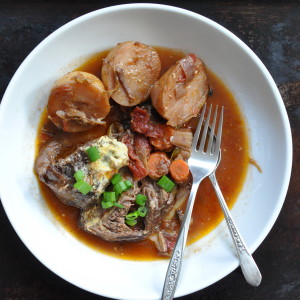
Braised Back Ribs
Last week I went shopping and damn near passed out in the meat aisle. A package of short ribs was going for $18. Even the ham hocks, once reliably inexpensive, cost over $15 a pair.
I tucked a package of back ribs into my cart–$7.49 a pound, in case you’re curious–and wondered why nobody braises them. Or if they do, why I don’t hear about it.

—
As their name indicates, back ribs come from the back of the cow. Being less meaty than short ribs means back ribs are less desirable. Meaning they’re cheaper. For now, anyway.
While nobody would mistake my package of back ribs for short ribs, nor would any reasonable person find them puny or lacking in meat.
—
Into the kitchen.
There are two ways to prepare a braise. The first, a method I employed for years, is the minimal effort approach: prep ingredients. Toss them into pot (or the slow cooker). Cook. Serve.
The second way is to build a braise. Instead of haphazardly flinging ingredients into cooking vessels, I began taking the time to pre-salt meats and brown them. I deglazed pans with wine, reduced those wines, then added flavorful ingredients like duck fat or pig parts. You get the idea.
Depending on your mood, building a braise can be extremely relaxing or highly annoying. Whatever your mental state, these time consuming steps are worth the effort. The point in braising is not futzing with weird, expensive ingredients nobody can pronounce. Just the opposite. The point of building a braise is to take extra time to make cheap, easily accessible food taste better. For good measure, you’ll be stretching it to feed more people.
To that end, I’ve included some examples of cheap, tasty ways to extend a braise. (Or stew, or soup.)

A few strands of orange peel. Citrus pairs well with beef, pork, chicken, and tofu. It also freezes well.

Salt preserved anchovies. Forget the tasteless rubbery erasers on cheap pizza. Trust me: I am a reformed anchovy hater. Salt and bones are easily removed under cool running water.

The judicious addition of salt pork (pictured above), pancetta, bacon, or other porky bits can only help a long-cooked dish. Quality salt pork is cheap. Buy a pound, slice it into smaller pieces, and freeze individually. They’ll keep indefinitely. Add to braises, stews, soups, and stir-fries.
For non-pork eaters, the next time you roast a chicken, freeze about three tablespoons of the cooking juices. Caveat: the chicken should be rather plain. You don’t want highly spiced juices impacting the braise. Think nice, plain chicken.

Yeah, it’s ugly. But it tastes good. That’s what matters.

A shot of brandy never hurts a braise or stew. Lacking brandy, fortified wines like dry Marsala, Port, or Madeira work beautifully. That bottle costing $55? Leave it on the shelf. See that $12 bottle in the corner? That’s the one you want.

Happily, even the cheapest olives are good, and I’ve yet to encounter truly bad tomato paste. As for whether or not to buy pitted olives, the choice is yours. I live with somebody who has breathing problems. I’ve had to do the Heimlich on him twice. Neither event involved olive pits, but why invite trouble? Pitted olives, all the way.
—
So as food prices soar–and given recent events, I suspect they aren’t going to plumment–you might think about adding one or two of the above ingredients to your next slow-cooked meal. Don’t add everything, or you’ll just have a confused mess. We hardly need more of that.
For today’s back rib braise, I added tomato paste, Marsala, and a piece of pancetta to the base recipe, which includes carrots and rutabaga.

I could’ve prettied up this bit of pancetta, but isn’t it nice to see something that hasn’t been airbrushed?
I realize many people aren’t on team rutabaga. Substitute turnips, or if you dislike those too, just add potatoes. Who doesn’t like potatoes?

Let us take a moment to discuss fat. Braised back ribs are fatty. There is no avoiding this fact. Most of this fat is marbled through the meat, tenderizing it during the long, slow, cooking. But some fat will break loose during cooking, floating around the cooking vessel and striking fear in the hearts of many. I lack photographic evidence of this, so instead give you carrots.

The best way to remove excess fat from your lovely braised back ribs is to permit them a nice refrigerated rest. Ideally this rest will be overnight. Barring that, give the dish a few hours to cool, allowing the fat to congeal and rise to the top of the cooking vessel, where you can easily remove it. Again, I lack photographic evidence of this.

In all honesty, some fat will remain in the body of the dish. These hard globules–I know, not very appetizing–are easily removed with a small spoon or your very clean hands. And yes, the idea of picking fat out of a stewy dish by hand may sound disgusting, but I want to be honest here. This is why disposable gloves are a good thing.

An entire head of garlic went into this recipe. I split it in half and tossed into the pot. To serve, I peeled a few cloves and left the rest whole. You can do the same, or remove the head of garlic and serve it separately. Diners can serve themselves, either adding cloves to their portions of braised rib or spreading the now sweet puree on bread. It’s up to you.

Serve braised back ribs with noodles, mashed potatoes, rice, or polenta. Mustard is a nice foil for the stew’s richness. And a green salad is a must. If you’re serving the garlic separately, offer bread, too.

Any leftovers are delicious in tortillas, with beans, thinly sliced white onions, shredded lettuce or cabbage, salsa, or hot sauce. Unorthodox, yes, but very good.

Braised Back Ribs
Serves: 2-3; easily scaled upward
Prep Time: about 30 minutes active time. 2.5-3 hours braising time in a conventional oven. 10-12 hours in a slow cooker on the low setting.
Braised Back Ribs may be prepared using an Instant Pot or a pressure cooker. I own neither of these items, so please consult your machine’s instructions.
Please see notes, below, for theme and variation. Instructions for preparation in a slow cooker–how I made this dish–are given following the oven recipe.
You will need a heavy, oven-safe pot, ideally with a lid. Lacking a lid, use tinfoil. Ceramic, enameled, or anodized aluminum–i.e., All-Clad–are all good choices.
This recipe requires browning and then scraping up the browned bits from the pan with a wooden spoon. A bottle of wine is then reduced in the pan. I do this in a Caphalon frying pan measuring 10 inches/24 cm across. A splatter guard is useful here.
olive oil
1 head garlic, papery outer layers removed, bulb left intact.
3-4 carrots, peeled and sliced into coins
1 yellow onion, peeled and thickly sliced
A few root vegetables:
1 large Rutabaga (Swede) peeled and chunked or
1 large Turnip peeled and chunked or
2-3 medium potatoes, peeled or not, chunked
1.5 pounds/680 grams bone-in back ribs
1 bottle decent dry red wine
1 tablespoon tomato paste
one 14 ounce/410 gram can whole peeled or chopped tomatoes
salt, pepper, a bay leaf
Optional additions (choose up to three)
1 small piece pancetta, diced
1 shot brandy, rum, dry Marsala, Madeira, or Port
a small piece of bacon, diced
1 or 2 slivers of orange peel, pith removed
a few tablespoons of cooking juices from a plain roasted chicken
a few pitted olives, halved
a salted anchovy, boned and rinsed of salt.
Preheat the oven to 325F/160C
Pour about three tablespoons olive oil into the braising vessel. Place it on a burner over low heat.
Halve the garlic, leave the stem end intact. It’s not disastrous if it’s sliced in two or falls apart during cooking. Leaving it in one piece just makes it easier to fish out later. Drop it into the pot.
Add the sliced onion and carrot to the pot, along with the root vegetables. Allow these to warm while you brown the meat.
Film a sturdy frying pan with olive oil. Heat to medium high. Once the oil is shimmering, add as many ribs to the pan as you can without crowding. Crowding the pan will steam the meat rather than browning it.
Allow the meat to brown on all sides. This is boring and rather messy, as oil likes to spit. You need to pay close attention, ensuring the heat is neither too high–burning the meat–nor too low–doing nothing at all. Browning each side takes anywhere from 5-8 minutes. You know the meat is ready to be turned when it releases easily from the pan. You may need to add more olive oil as you go.
As the meat is ready, add it to the pot of vegetables.
Once all the meat is browned, turn the heat down. If the pan is full of olive oil, you’ll need to pour it off. I use clean canning jars for this task. CAREFULLY pour the hot olive oil into the jar, or other heatproof receptacle. Allow to cool, then either refrigerate or discard in trash. DO NOT pour this down the drain.
If you need a break, now is the time to take it. Turn the heat down to the lowest setting under both pans. Don’t be long, okay?
I’ll wait.
Back? Okay. Get the wine. And the splatter guard. Pour about 1/4 cup/60 ml wine into the frying pan. Grab a wooden spoon, or a spatula. Something you can scrape with. Crank the heat up, and scrape the browned bits from the bottom of the pan. This is called the fond. You probably know that.
Once the fond is all scraped up, pour the rest of the wine into the pan, plonk the splatter screen atop it, and turn the heat up. You’re looking to reduce the wine pretty much down to almost nothing. More accurately, get it down to around 1/2 cup/120 ml. The wine will look dark and syrupy, and should just cover the bottom of the pan. Don’t fret over exact measurements; I eyeball it.
Carefully pour the wine over the meat and vegetables.
Add the tomato paste, smearing it around with the back of a large spoon if you have the energy. Add the canned tomatoes, salt, pepper, and bay leaf. Now is the time to add any extras, like that shot of Marsala or the diced pancetta.
Using the large spoon, snug the meat down into the vegetables, and give the ingredients a gentle stir so everything is nicely integrated. Put the lid on and tuck into the oven.
Braised back ribs take anywhere from 2 1/2 to 3 hours, depending on the ribs and your oven. Check them periodically. They should not need anything from you. They’re done when the meat easily pulls from the bones.
As noted in the post, braised back ribs are best when allowed to rest overnight, letting the fat rise to the top of the dish, where you can easily remove it. Also noted in the post, some fat will remain in the body of the dish, and is best removed with a small spoon or, very honestly, your clean or gloved hands.
The garlic may be removed and served separately. You can also squeeze the softened cloves from their papery husks and serve a few with the stew. The choice is yours.
Braised back ribs are delicious served with a starchy accompaniment like rice, mashed potatoes, polenta, or pasta. A green salad is welcome, as is good bread.
Like all stews, braised back ribs improve with time, keeping in the refrigerator up to five days. The cooked ribs in their juices freeze well, but the vegetables, alas, will only become soggy and flavorless.
To make braised ribs in a slow cooker:
Please consult your slow cooker’s instructions if necessary.
Instead of adding vegetables to the pot on an oven burner, place them in the slow cooker insert. When you are finished browning the meat, add it to the pot insert with the remaining ingredients. Turn the pot to the “low”setting. On my pot, “low” translates to 10-12 hours cooking time. Once the cooking time is up, allow the food to cool and either transfer it to another vessel or, if this is safe (consult your machine’s instructions), store and serve it directly from the insert.
Notes:
Weights are approximate. The dish will turn out fine if you buy 1 pound/450grams of meat or you buy 2 1/4 pounds/1 kilo. The cooking time may be a bit longer or shorter.
Vegetables are suggestions; add others if you wish: celery root, radishes, parsley root.
Also feel free to add a bundle of fresh herbs.

Share:
You might also like:
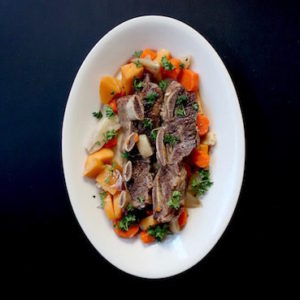
Braised Short Ribs
Braised Short Ribs belong to the important family of stews, braises, and daubes, those heartily earthy dishes of winter. In this discussion, the term “stew” is synonymous with “braise,” signifying a dish requiring long, slow cooking, usually in a low oven. My passion for braising began in grad school, while reading…
Pot Au Feu revisited
Pot-au-feu is one of the big classics. As such, it never goes out of style. I’ve yet to hear of attempts to veganize it, keto it, or substitute cauliflower for the meats and call it “clean” (this is not a suggestion. Food is not dirty unless you drop it on…
Chard Bundles with Chicken and Pomegranate Molasses
Chard bundles with chicken and pomegranate molasses hereby join the enormous culinary family known as stuffed vegetables. Anyone inclined to create a family tree of stuffed veg would be well advised to park chard bundles on the cabbage side, near the second cousins. You think I sound nuts? Have you…
