
Pie Crust
Today’s post is unusual in that the entire thing is a recipe: for pie crust. Rather than give an explanation followed by a recipe repeating much of the post, I decided to let the post be the recipe.

I realize many of you know how to make pie crust and are comfortable baking pies. But many people are not. Like risotto, mayonnaise, and whipped egg whites, pie crust falls into the strange but very real category of foods people fear cooking. Or, more accurately, baking.

Why this is so is a question for another day. For today, in response to a friend’s request, I am sharing my knowledge concerning pie crust. If I, a woman who learned to bake aged 49, tackling her fear of pie crust even later, you can, too.

Admittedly, my pie crusts (or tarts, etc) are a work in progess: I’ve yet to conquer working with lard or vegetable shortening.

Not that I’m all that eager to try baking with vegetable shortening.

Further, nobody will ever hire me for my decorative skills, which we can all agree are laughable. The tart pictured above was baked a year ago. I’ve made some progress since, but nothing I bake will ever look anything but rustic. And that’s being charitable. Then again, people don’t seem to care what my tarts look like. They just eat them.

—
Before starting, I encourage interested readers to consult the experts–Tamasin Day-Lewis, Dorie Greenspan, Erin McDowell, Stella Parks, Deb Perelman, and Claire Ptak, to name but a few authors whose books detail the hows and whys of pie, worthwhile information that, detailed here, would make for an even longer blog post. Today’s post is pie crust for beginners. It’s also pie crust for people who aren’t interested in knocking up hot water crusts around removable molds or creating lattices that look like they’re laser cut. If you fall into either category, this pie crust is calling your name.

Pie crust is comprised of few ingredients: flour, butter (or another fat), sugar, salt, and water (or another liquid).
Pie crust may be prepared three ways:
-in a processor
-using a pastry blender
-with your cool fingertips, which is the way we’ll discuss here
Good pie crust begins with cold ingredients. Really, really cold. Your butter should always be either refrigerated or even better, frozen before use. The water should be as cold as possible without turning to ice.
Ingredients:
2 sticks/8 ounces/227 grams sweet butter
2 1/2 cups/315 grams all-purpose flour
1 teaspoon fine salt
1 tablespoon sugar
1/2 cup/120 ml icewater
Start by placing your butter and water in the freezer or fridge.

Put the flour, sugar, and salt into a large bowl.

Now take part of the butter out of the freezer–in the US butter is sold in sticks, and this recipe uses two, so I take out one stick.

Cut the butter into small pieces. Put these into the bowl of flour. Handle the butter as little as possible. Do this until you’ve cut up all the butter.

I find a plastic cutting board is helpful here. Butter tends to stick to wood cutting boards.

If the butter begins melting and everything starts warm up and get messy, stick the butter, cutting board and all, into the fridge or freezer for a few minutes to cool off.
Once all the butter is cut up, take the water out of the fridge(or freezer). You won’t want to reach for it with floury hands. I speak from experience.

I blend the flour and butter hand. However you do it, you want the butter to break down into pea-ish size bits, or a bit bigger, and for the flour and butter to coalesce into a shaggy dough.

I know: this doesn’t look very coalesced. Also, it’s a terrible shot. Bear with me: it’s hard to be the baker and the photographer, especially when butter, flour, and a camera are involved.
Add the water now. You may not need all of it; I always do. Use your judgement. Don’t add more than the 1/2 cup.

In the above shot you can see the water. I know, masterful, right?
Blend the flour, butter, and water. You can use a spatula for this, but I prefer my fingers. This is the one time Reynaud’s syndrome is an asset. (basically, poor enough circulation to have a name.) You’ll have a rough dough. Set the bowl aside while you lightly flour a clean work surface.
Now tip the dough out and gently mix until everything comes together. Add as little flour as possible. Adding too much flour will make the crust tough.

This has to be one of the worst photographs I’ve ever posted. But I want you to see it because a dough is going to emerge from this ugly mess. I also want to remind everyone I am not responsible for this hideous countertop. My house is a bank flip.

A breather after those horrible pictures.
Form the dough into a rough rounded shape,

then halve it with a bench scraper or large knife.

Wrap each half in plastic wrap. Refrigerate the halves for at least one hour, so the gluten can relax while you clean up.

The dough can be refrigerated for seven days or frozen for three months.
This is enough for two 9-inch/22 cm open tarts or pies or one pie with a lid.
Congratulations! You just made pie crust!
—
To roll out the dough:
One hour before baking, take the dough out of the refrigerator. If you froze it, defrost it overnight in the refrigerator.
Lightly flour your clean work surface and your rolling pin. I know, the photo below looks like snowdrifts. Less flour is fine.

Dough likes to stick to work surfaces. To avoid this, keep it moving. Roll gently, from the center outward, turning the dough in quarter turns. Scatter a little flour over the dough and the rolling pin as needed.If the dough does stick to the work surface, use a fish slice or spatula to gently work the dough free without wrecking it.

Again, if the dough gets too warm, tuck it back in the fridge to cool off. Refresh your drink. If you live in the US, try not to doomscroll.
Roll the dough in this manner until your have a 9-10-inch (22-24 cm) round. Or oblong, as the case may be.

To move the pie crust to the baking pan, roll the dough up around the rolling pin, then unroll it on the baking pan or pie pan.

If the dough tears, just pinch it together with your fingers or tear a bit from an edge and use it as a patch. This is a forgiving dough.

Notes:
The above recipe originally came from Deb Perelman’s Smitten Kitchen Cookbook. Then I found it–with minimal variations–in numerous other cookbooks and realized it’s a blueprint for pie crust recipes, but credit where credit is due.
Stella Parks, in Bravetart, gives a nearly identical recipe for pie crust; hers calls for less flour and more salt.
For savory pie recipes, make the crust without the sugar.
Rolling pins are a personal choice. I have several, but my favorite is on the far right. It comes from a supermarket. The gold rolling pin is kept for sentimental reasons. It belonged to my grandmother.

Share:
You might also like:

Some bloggers plan their posts down to the final punctuation mark. I am not one of these people. This time was different. I had a vision of four fruit galettes, beautifully arranged and photographed, their fillings warmly aglow. You get the idea. Of course, my vision failed to manifest. There…
Cranberry Galette
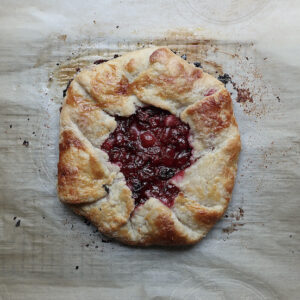
Thanksgiving feels like a century ago. Back then–what was it, two weeks? I has leftover cranberry sauce, so, in an effort to use it up, I baked a cranberry galette. This cranberry galette was a huge hit with Mr. IK, so I decided to bake more. Above, the galette that…
Plum Galette
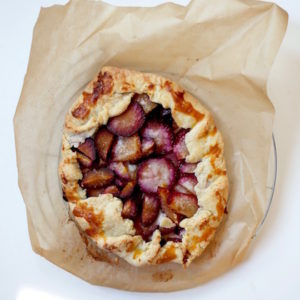
From Dictionary.com Goat Rodeo: a slang term for something going totally, unbelievably, disastrously wrong, and there’s nothing left to do but to sit back and watch the trainwreck. — Plum galette came about the way most of my recipes do: by accident. I had a glut of pluots…
