
Canned Tomatoes
This is a long post. I know some people dislike reading long posts, but this one discusses how to safely can tomatoes.
If you will never can a tomato in your lifetime, feel free to look at the photographs. If you want to can tomatoes but find my blow-by-blow explanation annoying, I refer you to Eugenia Bone’s excellent Well Preserved.

Thank you.
—
The very idea of canning tomatoes strikes terror in the hearts of many, who equate home preservation with botulism. This fear is understandable, but canning tomatoes is a lot like baking: as long as you follow instructions, everything will be fine.
Your kitchen doesn’t need to be surgically sterile, but it does need to be reasonably clean. Wipe down counters and other work surfaces. Clean the sink. Wash your hands. If you have long hair, pull it back.
Lids, Bands, and Jars
There are many fancy lids and jars on the market. I prefer the standard two piece metal band/flat lid, which screws onto a plain jar.

If your jar lids and bands are new, you do not need to sterilize them.
Bands are reusable. Lids are not.

If you are reusing bands, wash them in hot soapy water and rinse them thoroughly.
New or not, put your lids and bands in a small pot of water. Set this pot on a back burner, over low heat. The heat softens the lid’s rubberized flange, allowing a strong seal.

Canning jars are available in regular or wide mouth styles. I strongly recommend purchasing wide mouth jars, as they’re much easier to fill.

For putting up tomatoes, I use pint size jars, which hold 2 cups, or about 470 ml.
Lids, bands, and jars are sold at hardware stores, some supermarkets, and Target stores. (Readers outside the U.S.: Target is a large US chain selling everything from clothing to home electronics to kitchenware.)

Sterilize jars by running by them through the dishwasher. If you don’t have a dishwasher, wash jars in hot, soapy water and place them in a 170F/100C oven.
Canning equipment
Canning sets are sold in American hardware stores and online. These sets generally include a large canning pot, a canning rack, a plastic funnel, jar lifters, and plastic knives for popping air bubbles.

Unless you long for a canning set, save your money. You may purchase the pieces separately, as I did, or water bath can with equipment you already own. If you have a large, deep pot, a cake rack, tongs, and a funnel, you’re nearly there. The one piece of specialty equipment every home preserver needs is a jar lifter, which is just what it sounds like.

Jar lifter. This shouldn’t cost much.
You’ll also need oven mitts and wooden cutting boards. The boards are for your jars to rest on while they cool off. The mitts are obvious, and you likely already have some. But if you’re the kind of cook who uses dishtowels to grab hot pans, go buy oven mitts, okay?

You know what boards and mitts look like. Here is my smaller canner, with a cake rake inside. I have a larger canner. I bought this one during the drought.
Some people are sensitive to the acids in tomatoes. If you are one of these people, consider wearing disposable gloves while canning. This same information applies to knives: tomato acids fade wooden handles. Meaning this isn’t the time to use that hand-fashioned knife bought in a tiny European hamlet you may never return to. Now is the time for that knife you got at the supermarket that you usually hide in a drawer.

Bought at a Ralph’s Market in Culver City, California in 2015. It’s one of my favorite knives.
It’s wise to wear old clothing while tomato canning, as juices tend to spatter. If your working area is near curtains or blinds, move them out of the way. As for aprons, I’ve yet to find one that fits.

The worst photo I have ever uploaded. But it’s useful. This is my tomato prep setup, atop a metal prep table. (Bought at Webstaurant, since you ask. They have no idea I’m mentioning them.) Left to right: Roma tomatoes awaiting peeling. A jar of citric acid. Two vintage Pyrex custard bowls. The smaller one will hold citric acid. The larger one will hold canning salt. Vintage water glass, for hydration. Aforementioned knife. Vintage Pyrex bowl (do you see a pattern here?) of tomatoes, awaiting peeling. Beside the red bowl, yet another vintage Pyrex bowl, with a strainer inside it.
Citric Acid and Salt
To ensure complete safety, citric acid and canning salt are added to the tomatoes. Both are available wherever canning supplies are sold. Technically, you can use fine sea salt, but you’re going to need to citric acid anyway, so buy the canning salt. Both products are inexpensive and have long shelf lives.

Some people use lemon juice instead of citric acid, but I feel lemon juice adds unwanted flavor. Citric acid, on the other hand, is tasteless in the amounts used here.

Whatever you decide to use, DO NOT SKIP THIS STEP. Citric acid–or lemon juice–ensures a safe, shelf-stable canned tomato. Science lecture concluded.
Setting up your canner
Reckon on one jar per pound/454 grams of tomatoes. So for five pounds/roughly 1.5 kilos of tomatoes, sterilize five jars and five lids.

Fill a small saucepan with water. Add the lids and bands. Put the pot on a back burner over low heat.
Place your chosen canning pot on your stove’s largest burner. Make sure the rack is inside. I prefer cake racks to today’s canning racks. Whatever rack you choose must cover the pot’s bottom, or the jars may shift during processing and break.

I fill my canner using a large measuring cup. The water must be at least 3 inches/8 centimeters above the jar lids. Once the canner is full, I turn the burner to medium, just to get a jump on heating.
Eating vs. Canning Tomatoes
San Marzanos and Roma tomatoes, with their dry flesh and minimal seeds, are ideal for preserving. Avoid preserving heirloom tomatoes, as their high water content turns them to mush long before they reach the canner.

Delicous to eat. Terrible to preserve.

The tomatoes top right are San Marzanos. Can them.
Prepping Tomatoes for Canning
Place your largest cutting board on a work surface, along with the knife. A large roll of paper towels is useful, too, as the tomatoes can get watery.
Near the cutting board, set up a strainer in a large bowl, along with a large pot. Think soup pot or large saucepan.
Tomatoes must be peeled before canning. To loosen their skins, drop them into a pot of boiling water.

Cookbooks always say it’s a mere ten seconds before the tomato skins peel right off. In my experience, it can take longer. Test by fishing a tomato out–carefully, it’ll be hot–and halving it. If the skin slips off, fish the remaining tomatoes from the boiling water, halve, and core them, tossing the peels into the strainer.

Sample tomato. Not lovely, but instructive.
Once all the tomatoes are halved, cored, and peeled, seed them by squeezing them over the strainer in the pot. Don’t worry about getting every little seed. Just do the best you can.

Once you’ve finished peeling, coring, seeding, and filling you stockpot with tomatoes, you’ll also have a bowl of watery tomato juices beneath the strainer.

Treat this juice just like the tomatoes: can it, then use it to make bloody Marys, soups, salsas, sauces, and stews. It’s fantastic. (If you fall a bit short, it’s okay to top up that last can with water).
Place the pot of tomatoes on the stove over medium high heat. Bring the tomatoes to a gentle boil. Stir occasionally for five minutes.
(if you need a break, now is a good time to take it. Leave the pot of tomatoes on the stove over the lowest possible heat while you clean up your kitchen, visit the bathroom, eat a snack, check your phone, whatever.)

While the tomatoes simmer, I measure the citric acid into a small bowl and the canning salt into another. You will need a quarter teaspoon of citric acid and a teaspoon of salt in each jar. I put measuring spoons in each bowl, and place them on the counter beside the stove. DO NOT SKIP THIS STEP.

Once the five minutes are up, pull a hot jar from the oven. Place a funnel over the top, and spoon citric acid and salt into the jar. Now, using an immaculate spoon or ladle, fill the jar up to the top, leaving 1/2 inch/1.27 cm headspace. There’s a glass line on the jar; don’t fill past it. If the tomatoes poke above that line, push them down with a spoon. If there is too much food in the jar, remove some. Pop any air bubbles with a spoon.
If necessary, wipe jar rims with a clean cloth or paper towel dipped in white vinegar. Dirty rims compromise seals.
Now pop a lid on the jar, screwing it on “fingertip tight.” Fingertip tight means just what it sounds like–tight enough to stay put, not so tight you can’t undo it in six months.
Now, using jar lifters, lower the jar into the canner.
Carry on until all the tomatoes are used up. Now crank the heat up under the canner. Once the water is boiling, put the lid on and start timing.
Tomatoes need 40 minutes of canning time. The boil must be maintained. By boil, think making pasta: strong, but not so strong that the jars are rattling around the canner.
If at any time the pressure drops and the boiling ceases, you must deduct that time from the processing.
Once the 40 minutes are up, turn the heat off and let the tomatoes sit a few minutes. Then carefully remove the lid, away from your face.
Lift the jars out and put them on a wooden board. Allow them to cool at least 8 hours before testing the seal.

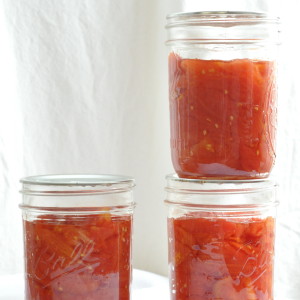
I posted these jars deliberately, as they exhibit something called “float.” Float occurs when there isn’t enough solid matter to fill the jar, so the food “floats” upward. It’s harmless, but doesn’t look as lovely as you might wish. See below for a “perfect” jar, alongside tomato water. And don’t fret beyond that. Life is too short.

To test the seal, remove the jar rims and pull at the lids with your fingers. You shouldn’t be able to remove them.
Label your jars with the date, then store them in a cool, dry spot, like a cupboard. They will be good for two years.
Seal failures
When in doubt, throw it out.
The most common reasons for seal failure is dirt or food between the lid and the jar. You can reprocess jars if the seals fail, but that advice has always bothered me. After all, the tomatoes have been unrefrigerated for hours by that point. If the seals are good, great. But if they failed, not so good, right?
If your seals loosen months later, throw the food out.
In 15 years of canning, I’ve had two seal failures. Both involved chicken broth, and both happened months after the fact. I’m still not sure why they failed, but when I realized those two batches had loose seals, I put on gloves and tossed the jars in their own trash bag, which I buried deep in the bin. Then I cleaned everything–the shelf, the pantry door, the sink– with janitor-grade ammonia.
—
In closing one of the longest posts I’ve ever written, a post that took me the better part of a month, let me say that preserving tomatoes is a kitchen task that is far easier to do than describe. I didn’t begin canning until well into my forties. At the time we were living in a condo with an electric oven. The oven sported four burners. Each heated to a different temperature. I had a demanding job outside the house and was in failing health. Nevertheless, I managed to fill the utility closet with hundreds of jars of tomatoes.
I canned, then and now, because it was a way to control an otherwise uncontrollable world. Certainly there are better ways to seek control, but canning offers a result other pursuits (obsessive cleaning, running) do not: a tangible product. Further, this tangible product may be shared with others. Can tomatoes and you’ll have a gift for nearly any occasion, to say nothing of a quick meal, a soup, a pasta sauce, a stew, or a quick meal.

Taken 9/4/09
Canned Tomatoes
Home preservation is safe so long as the cook does not deviate from the recipe. You must add citric acid and salt to each jar. Do not add additional ingredients, as they may compromise the safety of the recipe. If for any reason the seals loosen or the food looks, smells, or seems off in any way, throw it out.
Yield: Roughly speaking, 5 pounds/2.5 kilos of tomatoes=5 pint jars of tomatoes. A pint jar holds 2 cups/470 ml tomatoes.
Note: This recipe follows the American system of water bath canning. Please read the post before starting. The recipe that follows is a summary of the detailed information given in the post. Please read the post before starting.
For 5 pounds/2.5 kilos San Marzano or Roma Tomatos:
5 teaspoons canning salt
1.5 teaspoons citric acid
Sterilize your jars by running them through the dishwasher or washing them in hot soapy water, rinsing them thoroughly, and placing them in a low oven.
If your lids and bands are new, you do not need to wash them. Place them in a small saucepan of water. Put the saucepan on a back burner over low heat.
If reusing bands, wash in soapy water, rinse well, and follow above directions.
Put the canner on the stove. Make sure the rack is in place. Fill with water. Place on low heat. Note that water level must be at least three inches/2.54 cm above jars.
Set your kitchen up as noted in post, above, to prep the tomatoes. Dip tomatoes in boiling water to loosen their skins.
Remove tomatoes to cutting board. Halve tomatoes, remove skins, and core. I do this by making a triangular cut to get the stem end out. Toss skins and cores into strainer set in a large bowl.
Once all tomatoes are skinned and cored, squeeze each half over strainer to seed it. Don’t worry about getting every single seed out. Move the seeded tomato halves to large pot.
Once all the tomatoes are seeded, move the large pot to the stove. Bring to a low boil, stirring occasionally, for five minutes.
The tomato juices collected in bowl beneath the strainer may also be canned. If you run short of liquid in the final jar, top it up with water.
Place funnel in jar. Add a 1/4 teaspoon citric acid and 1 teaspoon salt. Ladle the tomatoes in, leaving 1/2 inch (1.27 cm) headspace in each jar. You’ll notice a glass line at the top of the jar–don’t fill beyond that, or you’ll compromise the seal.
Push down any bits of tomato sticking up past the fill line with a small clean spoon. Do the same if you see any air bubbles.
Clean jar rims with a paper towel or rag dipped in white vinegar. Cap each jar fingertip tight and lower into canner.
Once all the jars are filled, bring the canner to a vigorous boil for 40 minutes.
When the 40 minutes have elapsed, turn the heat off and let the jars sit for five minutes.
Remove to a wooden board and allow to cool, 8-12 hours, or overnight.
Test seals by removing rims. You should not be able to pull off lids with your fingers. If seals come off easily, they have failed. Discard tomatoes. See Seal Failures, above, in post.
Label and store up to two years in cool, dark cupboard.
Share:
You might also like:
Notes on Canning Tomatoes
The literature of canning abounds in talk of capturing time. Terms like “peak freshness”, “seasonality”, and “ripeness” are certain to appear whenever people begin musing over the meaning of canning. It’s all true. To can tomatoes in August is to hope you’ll be opening the jars in February. To gaze upon…
Fish Poached in Tomato Water

Fish poached in tomato water sounds pretentiously cheffy. Then again, it’s accurate. If I called it “fish poached in tomato juice” you might envision fish cooked in bloody mary mix, or worse. So fish poached in tomato water it is. Tomato water entered my culinary life via canning. Tomatoes are…
Roast Peppers Preserved Under Oil
I began writing this post two weeks ago. The world was a completely different place then. Here is a link to agencies assisting Afghan refugees, from the New York Times. Here is a link to help those impacted by the earthquake in Haiti, from National Public Radio. — It’s late…
